What is WP-CLI? #
WP-CLI, short for WordPress Command Line Interface, is a powerful tool that can be used to manage and maintain your WordPress website from the command line. It offers users a plethora of commands for various functions, like plugin installation, backup generation, core file updating, and many more.
Daniel Bachhuber has been the primary maintainer of the open source project known as ‘WordPress Command Line Interface (or, for short: ‘WP-CLI’) since 2003.
On August 8th, 2018, the new version of the WordPress Command Line Interface (known as “WPC-CLI v2”) became available.
For ChemiCloud customers, WP-CLI version 2.7.1 is readily available on all our Managed WordPress hosting plans; all you need to do is access your account via SSH, and you are good to go!
Installing WP-CLI #
The instructions below will be helpful if you don’t have WP-CLI installed on your server. It is essential to ensure your system meets the necessary requirements before installing it. Specifically, users must have a UNIX-like environment (including OS X, Linux, FreeBSD, or Cygwin) and partial support in Windows environments. Moreover, they should have PHP 5.6+ and WordPress 3.7+; however, note that older versions of WordPress may provide lesser functionality.
Once you’ve verified the requirements, download the wp-cli.phar file using wget or curl:
curl -O https://raw.githubusercontent.com/wp-cli/builds/gh-pages/phar/wp-cli.phar
Next, check the Phar file to verify that it’s working:
php wp-cli.phar --info
To use WP-CLI from the command line by typing wp, make the file executable and move it somewhere in your PATH. For example:
chmod +x wp-cli.phar
sudo mv wp-cli.phar /usr/local/bin/wp
If it was installed successfully, you should see something like this when you run wp --info:
[root@rs9-nyc ~]# wp --info
OS: Linux 4.18.0-425.10.1.lve.el7h.x86_64 #1 SMP Wed Jan 25 09:29:40 EST 2023 x86_64
Shell: /bin/bash
PHP binary: /opt/cpanel/ea-php72/root/usr/bin/php
PHP version: 7.2.34
php.ini used: /opt/cpanel/ea-php72/root/etc/php.ini
MySQL binary: /usr/bin/mysql
MySQL version: mysql Ver 15.1 Distrib 10.5.19-MariaDB, for Linux (x86_64) using readline 5.1
SQL modes:
WP-CLI root dir: phar://wp-cli.phar/vendor/wp-cli/wp-cli
WP-CLI vendor dir: phar://wp-cli.phar/vendor
WP_CLI phar path: /root
WP-CLI packages dir:
WP-CLI cache dir: /root/.wp-cli/cache
WP-CLI global config:
WP-CLI project config:
WP-CLI version: 2.7.1
For those using ChemiCloud Managed WordPress hosting, WP-CLI is available right away. Don’t know what version you’re working with? Utilize the wp cli version command to get an answer.
[root@rs9-nyc ~]# wp cli version --allow-root
WP-CLI 2.7.1
Updating WP-CLI #
You can update WP-CLI by using wp cli update or repeating the installation steps.
If WP-CLI is owned by root or another system user, you’ll need to run sudo wp cli update.
Managing WordPress #
Beginning a command requires wp followed by the desired command, subcommand, and essential and nonessential parameters.
Keep in mind that whatever WordPress directory you are in the terminal is what WP-CLI will work with. If you are using cPanel as the control panel, here’s a great guide on how to find the document root of your WordPress website in cPanel. So, for instance, changing directories to enter a different one may cause you to use another installation of WordPress.
Now let’s explore some practical WP-CLI commands as well as associated examples.
Installing WordPress #
To easily install WordPress using WP-CLI, here’s a list of commands that you should use:
# Download WordPress
$ wp core download
Downloading WordPress 6.2 (en_US)...
md5 hash verified: 34f279efe623025641bc11a69e3c02fa
Success: WordPress downloaded.
$ wp core download --locale=nl_NL
Downloading WordPress 4.5.2 (nl_NL)...
md5 hash verified: c5366d05b521831dd0b29dfc386e56a5
Success: WordPress downloaded.
By default, WordPress will be installed using the en_US locale code. In case you wish to install WordPress in a different language, you can use the --locale flag:
$ wp core download --locale=nl_NL
Downloading WordPress 6.2 (nl_NL)...
md5 hash verified: 34f279efe623025641bc11a69e3c02fb
Success: WordPress downloaded.
Here’s a great guide containing a list of all the WordPress Locale codes. (Hint – You can CRTL / CMD + F to find your language).
The second command will set up the wp-config.php configuration file with the database connection details. If you are using cPanel, make sure to create a database first.
$ wp core config --dbname=database_name --dbuser=database_username --dbpass=database_password --dbhost=localhost --dbprefix=mywp_
Success: Generated 'wp-config.php' file.
The third command will install WordPress using a couple of parameters:
# Install WordPress
$ wp core install --url=yourdomain.com --title="My WebSite Title" --admin_user=john.smith --admin_password=strongpassword [email protected]
Success: WordPress installed successfully.
Reinstalling WordPress #
You can reinstall WordPress core files using WP-CLI. The following command would download WordPress core without the default themes and plugins.
wp core download --skip-content --force
Running WordPress Core Updates #
wp core version
# Display the WordPress version
$ wp core version
6.2
wp core check-update
# Check for WordPress updates
$ wp core check-update
Success: WordPress is at the latest version.
wp core update
# Update WordPress to a newer version
$ wp core update
Updating to version 6.2 (en_US)...
Downloading update from https://downloads.wordpress.org/release/wordpress-6.2-new-bundled.zip...
Unpacking the update...
Cleaning up files...
No files found that need cleaning up.
Success: WordPress updated successfully.
Rollback WordPress to a Previous Version #
First, you’ll need to check on the previous WordPress version. You can find all the available versions here.
Suppose you want to roll back WordPress to the 6.0.3 version. The wp-cli command line that you should use is:
wp core update --version=6.0.3 --force
Checking for Missing or Modified WordPress Core Files #
wp core verify-checksums – this command verifies WordPress files against WordPress.org’s checksums. It is handy if you suspect your WordPress might be infected with malware or if there are missing WordPress core files.
$ wp core verify-checksums
Warning: File should not exist: wp-admin/error_log
Success: WordPress installation verifies against checksums.
Managing Plugins #
Using wp plugin you can easily manage plugins, including installs, activations, and updates.
wp plugin list – get a list of installed WordPress plugins:
$ wp plugin list
+---------+----------+--------+---------+
| name | status | update | version |
+---------+----------+--------+---------+
| akismet | inactive | none | 5.1 |
| hello | inactive | none | 1.7.2 |
+---------+----------+--------+---------+
If you want to see only a list of all active plugins which have updates available, you can use the following:
wp plugin list --field=name --status=active --update=available
wp plugin install – installs one or multiple WordPress plugins
To find the plugin names, you can visit the WordPress Repository and check out the URL. This is an easy way to get the name of a plugin from its repository.
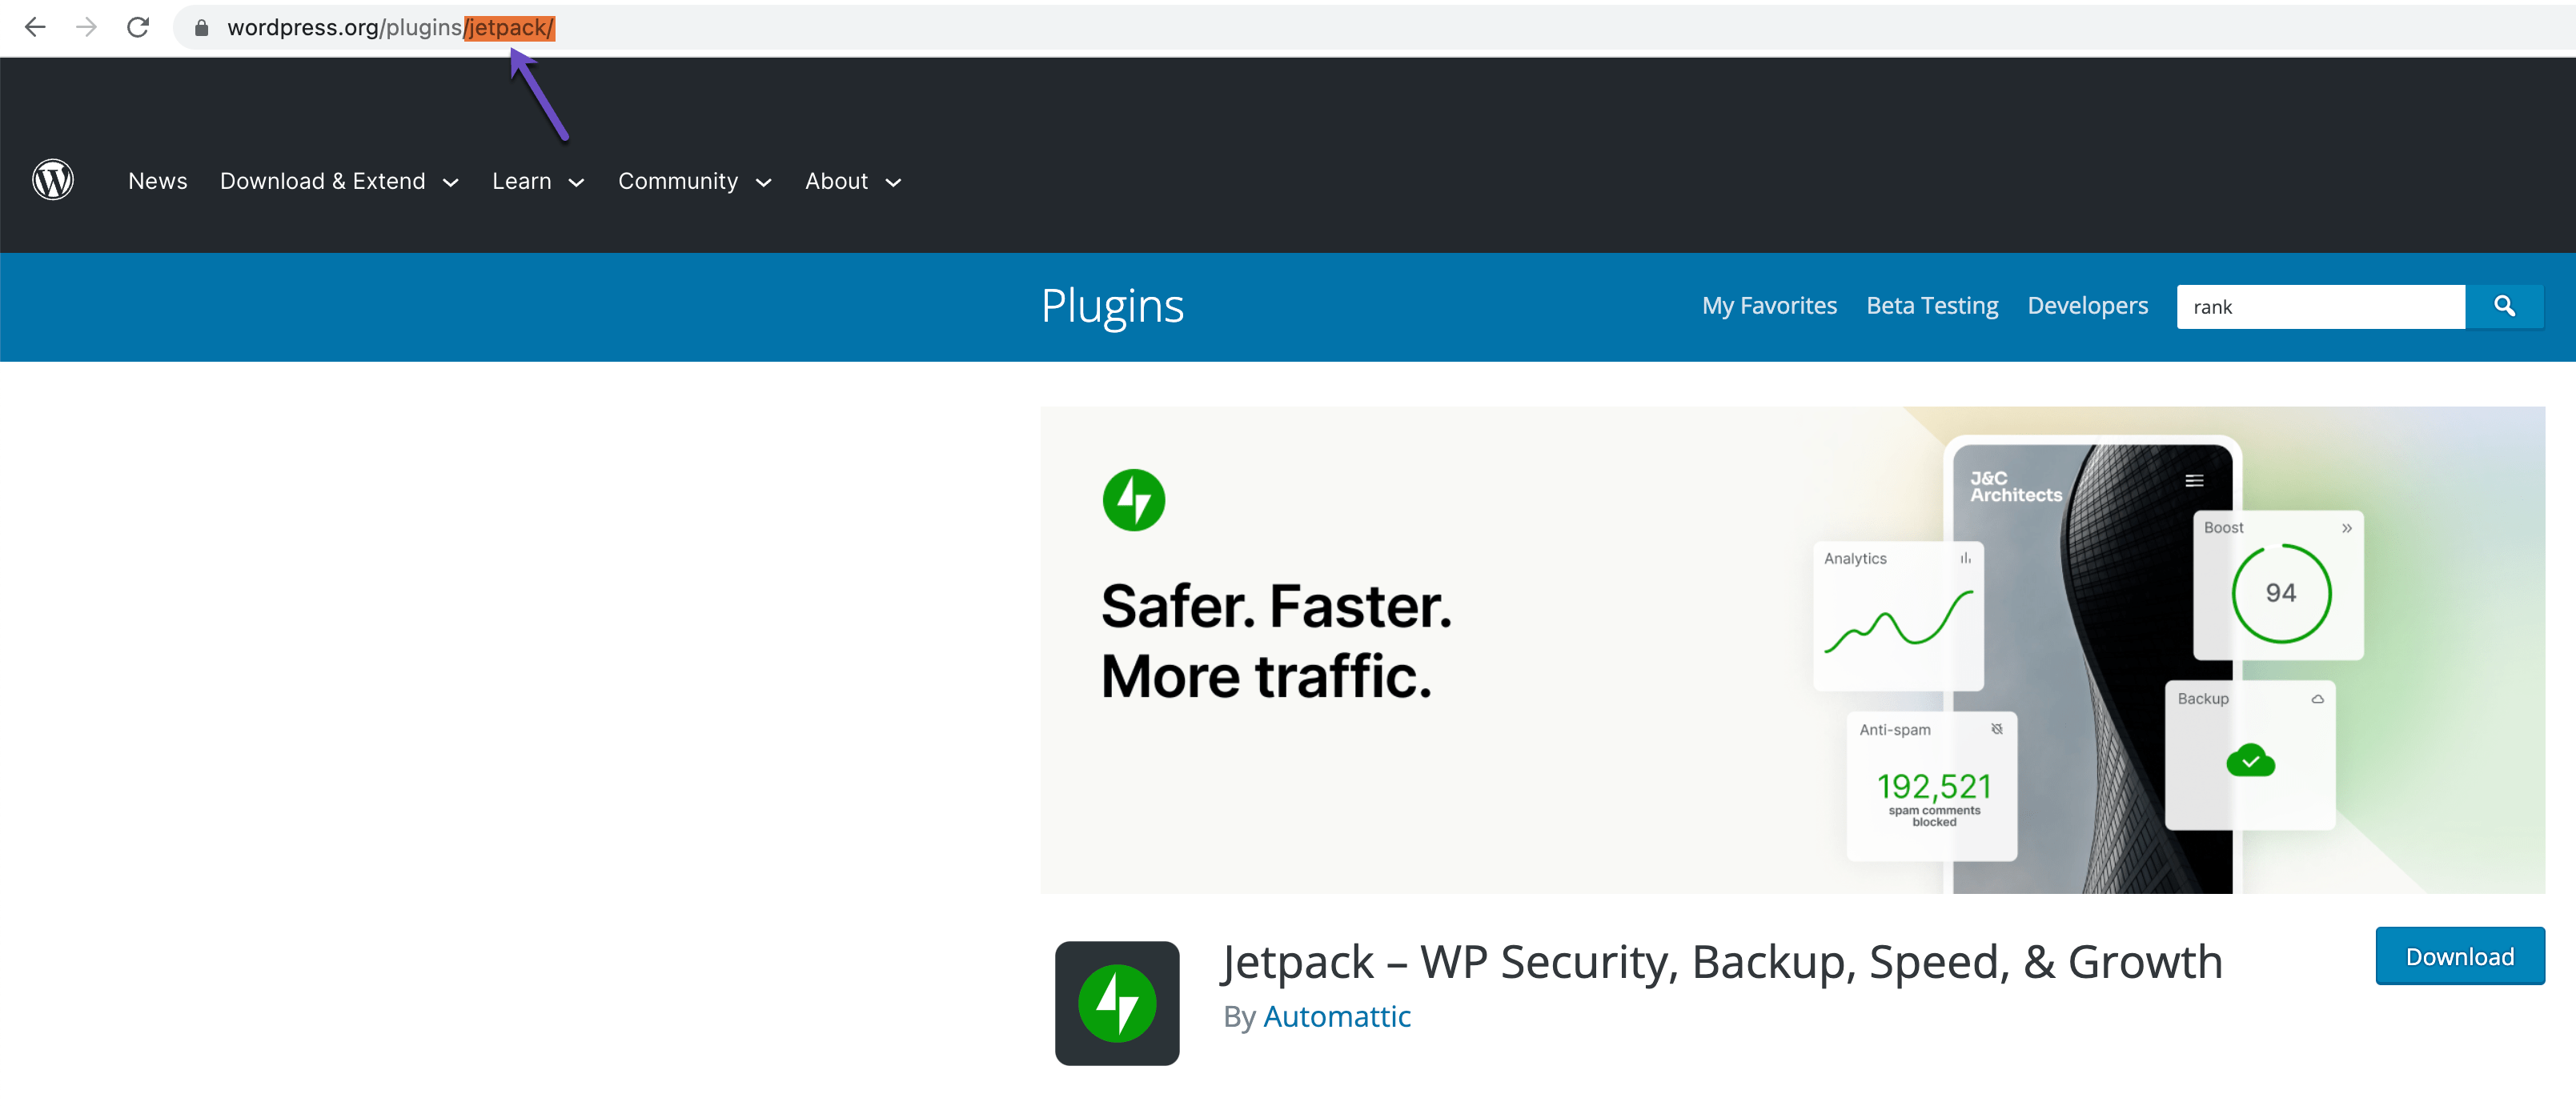
Alternatively, you can use wp plugin search searchterm which will give you a list of the slugs in the terminal.

# Install the latest version of the plugin and activate it:
$ wp plugin install jetpack --activate
Installing Jetpack – WP Security, Backup, Speed, & Growth (12.0)
Downloading installation package from https://downloads.wordpress.org/plugin/jetpack.12.0.zip...
Unpacking the package...
Installing the plugin...
Plugin installed successfully.
Activating 'jetpack'...
Plugin 'jetpack' activated.
Success: Installed 1 of 1 plugins.
Another remarkable feature of WP-CLI is that it allows you to install WordPress plugins from remote files, not just the repository. This is incredibly useful when you’re working on a plugin or using a premium plugin.
$ wp plugin install http://s3.amazonaws.com/bucketname/my-plugin.zip?AWSAccessKeyId=123&Expires=456&Signature=abcdef --activate
Downloading install package from http://s3.amazonaws.com/bucketname/my-plugin.zip?AWSAccessKeyId=123&Expires=456&Signature=abcdef
Unpacking the package...
Installing the plugin...
Plugin installed successfully.
Success: Installed 1 of 1 plugins.
To install multiple WordPress plugins, you can pile on parameters. Here’s an example that downloads and activates 3 plugins:
# Install multiple plugins:
wp plugin install really-simple-ssl seo-by-rank-math litespeed-cache --activate
In some cases, installing a previous version of WordPress plugins may be necessary. To do so, use the --version= flag
wp plugin install seo-by-rank-math --version=1.0.110 --activate
To get a previous version of a plugin, the first thing to do is search for the plugin in the WordPress repository. Scroll down on the plugin’s page and click on the “Advanced View.”
Scroll to the bottom of the page, and you will see an option to download previous versions of the plugin:

To deactivate a single plugin, you can run the following command:
$ wp plugin deactivate jetpack
Plugin 'jetpack' deactivated.
Success: Deactivated 1 of 1 plugins.
In the event of compatibility issues, it can be helpful to deactivate all plugins at once. Utilizing the command below makes it possible to do so quickly and easily. Afterward, you can reactivate them individually while testing for any conflicts.
To deactivate all your plugins at once, run the following command:
$ wp plugin deactivate --all
Plugin 'hello' deactivated.
Success: Deactivated 1 of 3 plugins.
You can also manually update WordPress plugins. Example below:
$ wp plugin update jetpack
Success: Plugin already updated.
Additionally, you can update all your WordPress plugins. Example below:
$ wp plugin update --all
Success: Plugin already updated.
Finally, you can also manually remove a WordPress plugin using the following command:
$ wp plugin delete jetpack
Deleted 'jetpack' plugin.
Success: Deleted 1 of 1 plugins.
Managing a WordPress Database #
wp db performs basic database operations using credentials stored in wp-config.php.
wp db export exports the database to a file.
$ wp db export
Success: Exported to 'cchostingdemos_wp342-2023-04-24-50121f9.sql'.
wp db import imports a database from a file.
$ wp db import cchostingdemos_wp342-2023-04-24-50121f9.sql
Success: Imported from 'cchostingdemos_wp342-2023-04-24-50121f9.sql'.
wp db optimize optimizes the database.
$ wp db optimize
Success: Database optimized.
wp db repair repairs the database.
$ wp db repair
Success: Database repaired.
wp db reset removes all tables from the database.
$ wp db reset
Are you sure you want to reset the 'cchostingdemos_wp342' database? [y/n] y
Success: Database reset.
wp db search finds a string in the database.
$ wp db search "[email protected]"
mywp_options:option_value
6:[email protected]
mywp_users:user_email
1:[email protected]
wp db size displays the database name and size.
$ wp db size
+----------------------+----------+
| Name | Size |
+----------------------+----------+
| cchostingdemos_wp342 | 704512 B |
+----------------------+----------+
wp db size --tables displays the database tables and size for each.
$ wp db size --tables
+-------------------------+---------+
| Name | Size |
+-------------------------+---------+
| mywp_usermeta | 49152 B |
| mywp_users | 65536 B |
+-------------------------+---------+
wp db tables lists the database tables.
$ wp db tables
mywp_commentmeta
mywp_comments
mywp_links
mywp_options
mywp_postmeta
mywp_posts
mywp_term_relationships
mywp_term_taxonomy
mywp_termmeta
mywp_terms
mywp_usermeta
mywp_users
Managing WordPress Users #
wp user manages users and their roles, capabilities, and meta.
The following command will list all the users on your WordPress install:
# List users
wp user list
# List users with administrator role
wp user list --role=administrator
The following command will create a new user on your WordPress install. The available roles are administrator, editor, author, contributor, and subscriber.
# Create a new administrator user.
wp user create john [email protected] --role=administrator
Success: Created user 5.
Password: C2p0MS4zCa
The following command will delete the user and re-assign all posts to another user:
# Delete user john and reassign posts to user paul
$ wp user delete john --reassign=paul
By following the below steps, you will manage to reset the password for a specific WordPress user
Step 1: List all the users and find the ID of the user you'd like to change password:
$ wp user list

Step 2: Change password for specified user ID:
$ wp user update 1 --user_pass=2DeBa10XjxD3Z8Ma
replace "1" with the id of the user you want to change password.
The following command will help you change the email address for a specific WordPress user:
Step 1: $ wp user list
# to see all users. Find the ID of the user you'd like to update email address

Step 2: update the email address:
$ wp user update 1 --user_email=<email> replacing "1" with the id of the user you want to update and <email> with the new email address.
The following command will help you set or modify a WordPress user role:
Step 1:
$ wp user list
# to see all users. Find the ID of the user you'd like to update.

Step 2:
$ wp user set-role 1 administrator
Success: Added johndoe (1) to http://example.com as author.

# Available roles:
administrator
editor
author
contributor
subscriber
Performing a WordPress Database Search and Replace #
wp search-replace searches and replaces strings in the database. e.g.: replacing any match of an old domain name with a new domain name.
Before running this command, we strongly recommend you do a backup for your database using the following command line:
wp db export
Once you’ve ensured that you have a backup for the database, you can safely use the wp search-replace command:
wp search-replace 'https://old-domain.com/' 'http://new-domain.com/' --precise --recurse-objects --all-tables-with-prefix
| Parameter | Description |
|---|---|
| –precise | Force using PHP (instead of SQL), which is more thorough but slower. |
| –recurse-objects | Enable recursing into objects to replace strings. |
| –all-tables-with-prefix | Enable replacement on any tables that match the table prefix even if not registered on $wpdb. |
Using wp maintenance-mode You can control the maintenance mode on your WordPress site. Example:
wp cron event list
This command displays all scheduled cron events with their hook names, next run time, and recurrence.
To run a specific cron event immediately:
wp cron event run <hook>